

There’s a moment every iOS developer dreads when building a location-aware app: you need to show it working, not just describe it. Screenshots are fine for static UI. But for an app whose whole value proposition is a compass needle pointing you back to your car in the wilderness — you need motion. You need a preview.
I went outside to record a 30-second App Preview for GeoReturn. The problem was immediately obvious: the data on screen said North Texas. The motif said Rocky Mountain National Park. To explain how those two things ended up in conflict, I have to back up about three weeks.
The Location Hunt
It started with a map.
GeoReturn’s new release was themed around hiking — the kind of trail use where it genuinely earns its keep. You park at a trailhead, tap to mark your car, hike out for hours, and when you’re ready to head back GeoReturn’s ADF-style navigation pointer points you home. No network required. No cell coverage needed.
Before I could write a word of App Store copy or frame a single screenshot, I needed a location that could tell that story visually. Not just any location — one with the right mix of elements:
- A real parking lot to anchor the “mark your car” setup
- Genuine wilderness trail for the navigation payoff
- Plausible cell dead zones — GeoReturn’s offline capability is a feature, not a limitation, and the location needed to make that credible
I started close to home, with a town in North Texas. Flat, suburban, and the map had no meaningful parking lots to anchor the feature. Eliminated.
I tried Nashville, Tennessee. Urban density was fine but Nashville is not a credible cell dead zone. The whole point of GeoReturn is that it works where your phone doesn’t have a signal. Eliminated.
The Grand Canyon tempted me. Dramatic imagery, genuine wilderness. But too remote, insufficient urban anchor nearby for the “park your car” setup phase. Eliminated.
Then I found it: Rocky Mountain National Park paired with Estes Park, Colorado. The Bear Lake Trailhead specifically. A proper parking area right at the trailhead — clearly visible in Google Earth Pro — with dense forest trail heading immediately into the backcountry. Estes Park a few miles down the road provides the urban anchor. And Bear Lake sits at 9,475 feet, comfortably inside “you might not have service up here” territory.
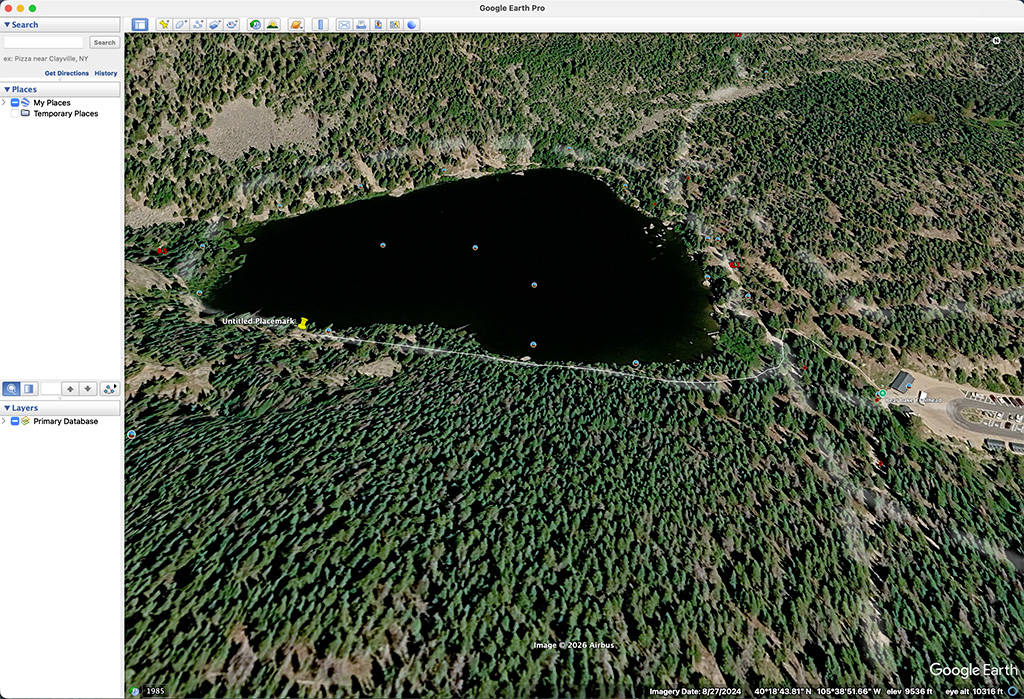
This was the location. The motif was locked. I built all my App Store screenshots around it.
The Preview Problem
Screenshots done, someone suggested I try an App Preview — Apple’s 30-second video slot on the App Store product page. Good idea. GeoReturn’s navigation pointer in motion tells the story far better than any static image.
The obvious move was to go outside with my phone and record GeoReturn navigating me back to my car. Simple enough — until I thought it through for ten seconds. I’m in North Texas. My entire App Store presentation says Rocky Mountain wilderness. The moment I start walking around a flat suburban parking lot with Texas coordinates on screen, the illusion collapses. The data betrays the story.
So I went outside anyway, just to confirm what I already suspected. I was right. The data on screen said North Texas. The motif said Rocky Mountain National Park.
What I needed was a way to feed GeoReturn a GPS track that said “you are hiking in Colorado” — from my desk.
What Xcode Can Do (That Most Developers Don’t Know About)
Here’s something about the iOS Simulator that surprises a lot of developers: it can play a GPS track. Feed it a properly formatted file and your app believes it’s moving through the world in real time. The simulator paces through waypoints using timestamps embedded in the file, and your CLLocationManager delegate methods fire exactly as they would on a real device.
The file format the simulator requires is GPX — GPS Exchange Format. An XML schema designed for exchanging GPS data, around since 2002.
The natural tool for authoring a GPS track — drawing it visually on real satellite imagery — is Google Earth Pro. You trace the route along the actual trail, drop points, and export the result.
Google Earth exports KML. Keyhole Markup Language. Also XML, also geographic, completely incompatible schema. The simulator won’t touch it.
That gap — KML out of Google Earth, GPX required by Xcode — is the problem simgpx solves.
Enter simgpx
simgpx is a Python command-line tool that converts Google Earth KML track files into timed GPX files ready for Xcode Simulator playback. It also handles the case where you just need to drop a pin at a single coordinate — no motion required.
Python 3.10 or later, zero dependencies beyond the standard library. Installation is two commands:
cp simgpx.py /usr/local/bin/simgpx
chmod +x /usr/local/bin/simgpx
Two Modes
Track mode takes a KML path and produces a timed GPX track:
simgpx BearLakeHike.kml
Point mode drops the simulator at a single GPS coordinate:
simgpx 40.311200, -105.645900
Input type is auto-detected — .kml extension gets track mode, a coordinate pair gets point mode.
For the Bear Lake preview I used both. First a pin at the trailhead to verify I had the right coordinates, then the full track for the actual recording:
# Verify the starting point first
simgpx 40.312012, -105.645950 name="Bear Lake Trailhead" output=BearLake_point.gpx

# Generate the full hiking track
simgpx assets/BearLakeHike.kml name="Bear Lake Hike" output=BearLake_track.gpx start=now+1m velocity=1s
The two-file workflow is a habit worth adopting. Confirm your coordinates with a pin drop before you invest time drawing the full KML track.
Track Points Are Frames
Before getting into the parameters, the most important concept in simgpx is one that has nothing to do with the tool itself — it’s about how you draw your track in Google Earth.
Think of your KML track points like frames in a film. A 24fps movie needs 24 frames per second to look smooth. Each point you place in Google Earth is a frame in your simulation. Draw a 2-mile trail with 10 widely spaced points and the simulator will jump between them in large lurches — your navigation pointer will teleport rather than sweep. Draw the same trail with 200 closely spaced points and GeoReturn moves fluidly, the way it does with real GPS data streaming in.
Point density controls the resolution of your simulation. The velocity= parameter controls the speed. They’re independent of each other.
The Start Delay — The Most Practical Feature
That start=now+1m in my Bear Lake command deserves its own paragraph.
Here’s the workflow reality: you run simgpx, then you need to open Xcode (if it isn’t already open), build and launch GeoReturn in the simulator, navigate to Debug → Simulate Location → Add GPX File to Project, select your GPX file, get the app into the right state to demonstrate the feature, and be ready to record — all before the track starts playing. On a good day that’s 45 seconds. On a day where Xcode decides to re-index something, it’s longer.
The start delay is your runway. start=now+1m gives you 60 seconds from the moment you hit return. start=now+3m if you’re also making coffee.
The start= parameter accepts several formats:
| Format | Meaning |
|---|---|
now | Immediate — for when you’re already set up |
now+1m | 1 minute from invocation |
now+3h5m30s | Precise offsets for complex setups |
12:30 | Fixed time today (UTC+0) |
2025-07-04T09:30 | Specific datetime — useful for scripted repeatable tests |
Velocity: Controlling Playback Speed
The velocity= parameter controls how quickly simgpx advances through your track points in simulated time.
The default is velocity=1s — one second of simulated time between each track point, regardless of the distance between them. Combined with densely placed KML points, this produces slow, smooth, granular movement — good for testing location-sensitive UI where you want to watch every state change.
For more intuitive control, named presets calculate timestamps proportionally to the actual distance between your points, matching real-world movement:
| Preset | Speed |
|---|---|
walk | 5 km/h |
hike | 3 km/h |
drive | 50 km/h |
drive:90 | Custom km/h |
And for preview recording specifically, total: mode is the most useful of all:
simgpx route.kml velocity=total:2h
This spreads your entire track evenly over exactly 2 hours, regardless of distance or point count. When you’re trimming to Apple’s 30-second window anyway, physical accuracy matters less than controlling the playback duration. “Spread this over 90 seconds” is often the right question.
The full velocity= reference:
| Format | Meaning |
|---|---|
1s | 1 second between each point (default) |
30s | 30 seconds between each point |
1m30s | 1 min 30 sec between each point |
walk | 5 km/h, distance-proportional |
hike | 3 km/h, distance-proportional |
drive | 50 km/h, distance-proportional |
drive:65 | 65 km/h, distance-proportional |
total:45m | Entire track spread over 45 minutes |
total:1h30m | Entire track spread over 1 hr 30 min |
The Xcode Side
Once you have your GPX file, loading it into the Simulator has one important gotcha: do not drag and drop the file onto the simulator window. That opens it in the Files app, which is not what you want.
The correct path: with your app running in a debug session, go to Xcode → Debug → Simulate Location → Add GPX File to Project… Select your file and it appears in the Simulate Location submenu. Select it and the simulator starts playing the track.
For iterative testing, you don’t need unique filenames. Run simgpx to the same output file before each test and Xcode picks up the updated content automatically:
# Re-run to the same file — Xcode uses the updated version automatically
simgpx assets/BearLakeHike.kml output=test velocity=hike
If the simulator loads the file but doesn’t move, the usual culprit is either CLLocationManager.startUpdatingLocation() not being called, or location permission not granted in the simulator settings.
The 30-Second Cut
Apple allows a maximum of 30 seconds for an App Preview. A 2-mile hike at hike speed (3 km/h) would take the better part of an hour in real time — obviously useless for a recording session. This is where velocity=total: earns its place.
The story I wanted to tell in 30 seconds:
- Fade from Maps (“find the lot”) showing the Bear Lake Trailhead parking area
- GeoReturn marking the car
- Time cut — you’ve been hiking
- GeoReturn’s ADF-style navigation pointer locking onto the waypoint and pointing home
The pointer moving in real time was the shot. Everything else was setup. With a track running at velocity=1s and closely-spaced KML points through the Bear Lake trail, the pointer moved exactly the way I wanted — smooth, purposeful, and unmistakably in Rocky Mountain National Park.
From my desk in North Texas.
One More Small Convenience
If you run simgpx without specifying name= or output=, it doesn’t produce a generic output_track.gpx. It reverse geocodes the centroid of your track — the geographic average of all your KML points — using Nominatim (OpenStreetMap’s geocoding service, free, no API key required) and uses the result as the filename.
Run a track through Bear Lake and you get RockyMountainNationalPark_track.gpx in your current directory. When you’re juggling multiple test tracks across different locations, that’s a small thing that saves real confusion.
The Full Command Reference
# Minimal — auto-name from geocoding, 1s intervals, starts in 1 minute
simgpx BearLakeHike.kml

# Full control
simgpx BearLakeHike.kml \
  name="Bear Lake Hike" \
  start=now+5m \
  velocity=hike \
  output=~/Desktop/BearLake

# Drive at 65 km/h starting at a specific time
simgpx route.kml start=2025-07-04T09:30 velocity=drive:65

# Spread the whole track over exactly 2 hours
simgpx route.kml velocity=total:2h

# Single GPS pin — no timing, no motion
simgpx 40.311200, -105.645900

# Named pin with custom output location
simgpx 40.311200, -105.645900 name="Bear Lake Trailhead" output=~/Desktop/BearLake
Get It
simgpx is open-source on GitHub: github.com/AlwaysRichard/simgpx
Single Python file. Standard library only. No pip installs. If you build location-aware iOS apps and you’ve ever needed to test or record with coordinates you can’t physically stand on, this fills the gap Xcode leaves open.

Richard Cox is a solo iOS developer and semi-retired software architect building apps under the AlwaysPhotographingbrand. He writes about the technical side of app development at GeekDistractions.com.
Leave a Reply